Image Editing Guide
Pic Size Reduce: How to Make Images Smaller Without Losing Quality
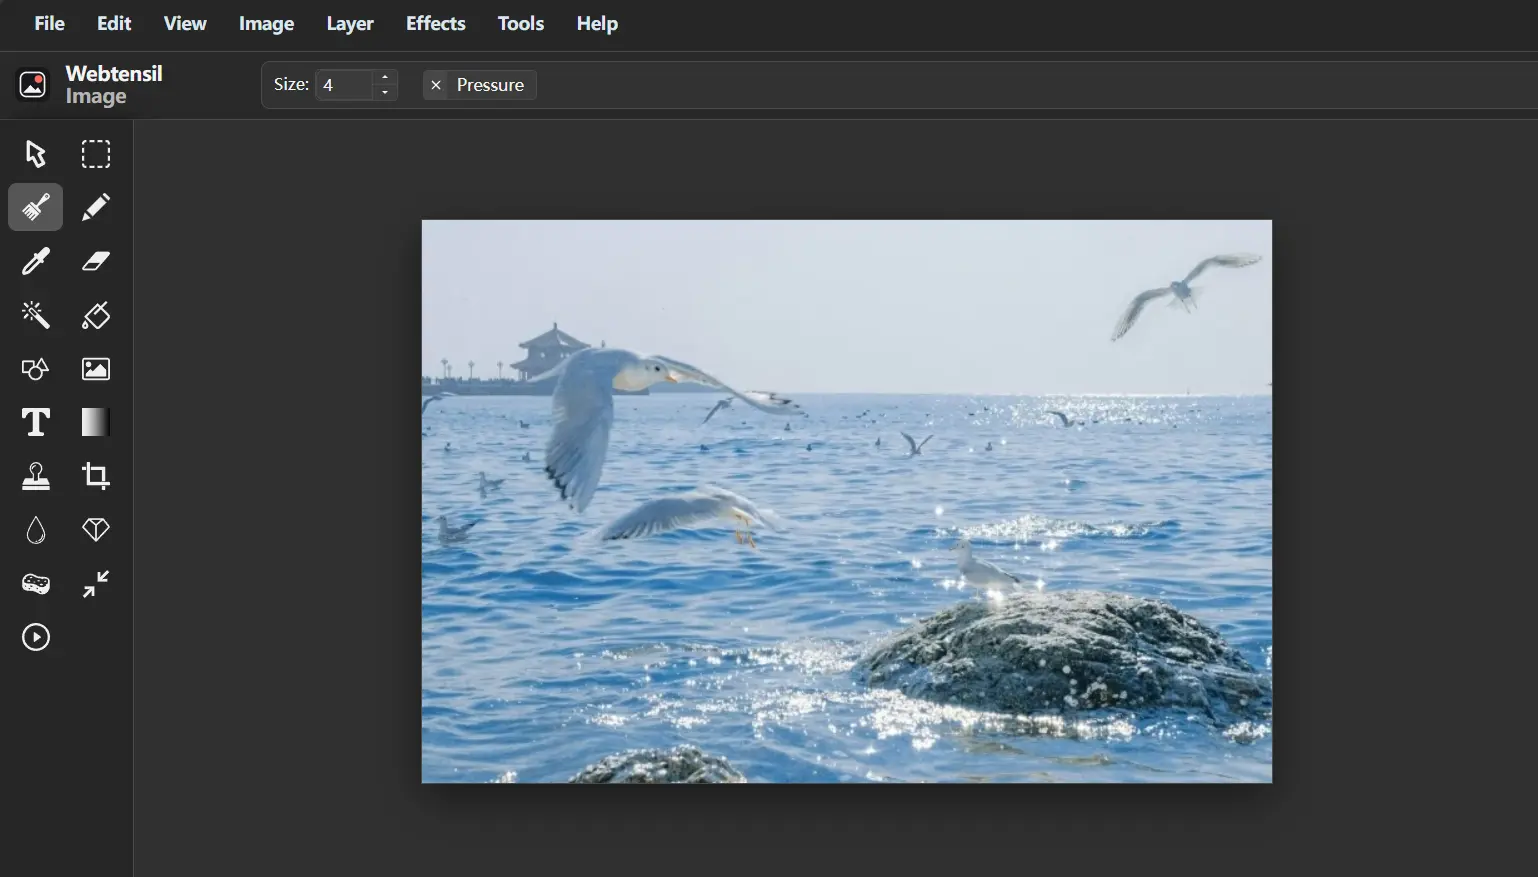
Large image files can become a problem when you create content every day. A high-resolution photo may look beautiful, but it can slow down websites, take longer to upload, and make sharing files with clients more difficult. For freelance designers and content creators, managing image size is an important part of keeping a fast and efficient workflow.
Many people search for ways to pic size reduce because they need smaller images for websites, social media, emails, or online projects. The challenge is finding the right balance between reducing file size and keeping the image quality clear.
You do not always need expensive design software or complicated tools to optimize your images. With the right approach, you can reduce image size, resize pictures, and make basic improvements quickly using simple browser-based editors.
In this guide, we will explain why image size matters, how to reduce picture size without damaging quality, and how tools like Webtensil Image can help creators manage everyday image editing tasks more efficiently.
Why Do You Need to Reduce Picture Size?
Modern cameras and smartphones can create extremely large image files. While high-resolution images are useful for professional printing, they are often much larger than necessary for online use.
For example, a photo taken with a modern smartphone may be several megabytes in size, even though a website or social media post may only need a much smaller version.
Reducing image size can help with:
- Faster website loading
- Quicker uploads
- Easier file sharing
- Lower storage usage
- Better mobile browsing experience
- More efficient content creation workflows
For creators who publish images regularly, reducing unnecessary file size can save time every day.
What Does Pic Size Reduce Mean?
The phrase pic size reduce usually refers to making an image smaller in one or more ways.
There are two common methods:
Reduce Image Dimensions
This means changing the width and height of the image.
For example:
- Original: 4000 × 3000 pixels
- Reduced version: 1200 × 900 pixels
The image contains fewer pixels, making the file smaller.
Compress Image File Size
Compression reduces the amount of data stored inside the image file.
For example:
- Original JPG: 5 MB
- Compressed JPG: 800 KB
The image dimensions may stay the same, but the storage size becomes smaller.
In many cases, combining resizing and compression gives the best results.
How to Reduce Picture Size Without Losing Quality
A common concern is that reducing image size will make pictures blurry or low quality.
The key is to avoid reducing too much.
Here are some practical tips.
Choose the Right Image Dimensions
Before reducing an image, think about where it will be used.
A website banner, blog image, and social media post all require different sizes.
Uploading a huge image when a smaller version is enough wastes storage and loading time.
A good workflow is:
- Check the platform requirements.
- Decide the final image size.
- Resize the image.
- Adjust quality settings.
- Export the final version.
Keep Your Original Files
Always keep a copy of the original high-quality image.
You may need it later for:
- Different website sizes
- New social media formats
- Client revisions
- Future design projects
Instead of repeatedly editing the same compressed file, create new versions from your original image.
Avoid Over-Compression
Making an image as small as possible is not always the best solution.
Heavy compression can create:
- Blurry details
- Pixelated areas
- Poor text quality
- Visible image artifacts
The goal is a good balance between smaller file size and clear appearance.
A Simple Workflow for Freelance Designers
Freelance designers and content creators often handle many small image tasks every day.
You may need to:
- Resize a photo for a blog
- Crop an image for social media
- Add text to a promotional graphic
- Adjust colors
- Apply filters
- Prepare files for clients
Using multiple applications for each task can slow down your workflow.
A browser-based editor can make this process easier by keeping common editing tools together.
A simple workflow could be:
- Open your image.
- Crop unnecessary areas.
- Reduce image dimensions.
- Adjust colors or brightness.
- Add text or design elements.
- Export the final image.
This saves time and reduces unnecessary steps.
Using Webtensil Image for Image Size Reduction
Webtensil Image is a free browser-based image editor designed for everyday creative tasks.
Instead of only reducing image size, it allows creators to edit images before exporting the final version.
The tool includes features such as:
- Image resizing
- Cropping
- Layer-based editing
- Text editing
- Selection tools
- Brush tools
- Color adjustments
- Blur effects
- Sharpening
- Filters
The layer system is especially useful for designers.
For example, if you create a social media graphic with a photo, logo, and text, you can manage each element separately. This makes it easier to adjust layouts before creating the final image.
Webtensil Image works directly in your browser without requiring downloads, installation, or account registration.
Why Browser-Based Image Editing Can Be More Convenient
Professional editing software is powerful, but it may be unnecessary for simple daily tasks.
Sometimes you only need to reduce image size, crop a photo, or make a quick adjustment.
A browser-based editor can be useful because:
- You can access it from different computers
- You do not need to install software
- You can start editing immediately
- Common tools are available in one place
For creators who need fast results, reducing unnecessary steps can improve productivity.
Consider Privacy When Editing Images Online
Image privacy is another important consideration.
Freelancers may work with:
- Client designs
- Private photos
- Unreleased marketing materials
- Business graphics
Webtensil Image performs its core editing locally in the browser, meaning images can be processed on your own device instead of being uploaded to an application server.
This can be helpful for creators who want a convenient editing experience while keeping better control over their files.
However, always follow client requirements and privacy agreements when handling professional materials.
Common Mistakes When Reducing Image Size
Many people reduce image size incorrectly and end up with poor results.
Here are some mistakes to avoid:
Reducing the Wrong Image
Do not edit a low-quality copy if you still have the original.
Start with the best available version.
Ignoring Image Purpose
A website thumbnail does not need the same size as a portfolio image.
Choose dimensions based on how the image will actually be used.
Compressing Multiple Times
Repeatedly saving compressed images can reduce quality.
Keep your original file and create new optimized versions when needed.
Removing Too Much Detail
A tiny file size is not useful if the image no longer looks professional.
Quality still matters.
A Quick Checklist Before Publishing Images
Before uploading an image, check:
- Is the image larger than necessary?
- Does it have the correct dimensions?
- Is the quality still clear?
- Is the text readable?
- Is the file size reasonable?
- Do you still have the original version?
These simple checks can improve your image workflow significantly.
What is the best way to resize images?
I use this free online tool to resize images.
How to do it in 30 seconds:
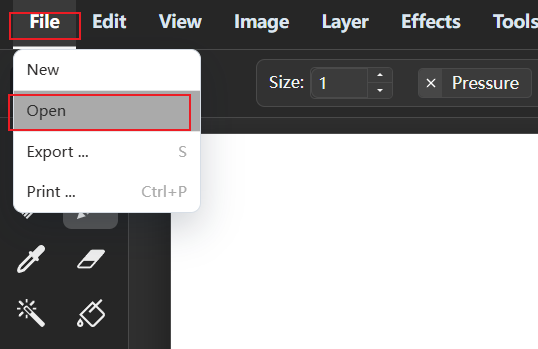
Step 1. Open a file
File > Open
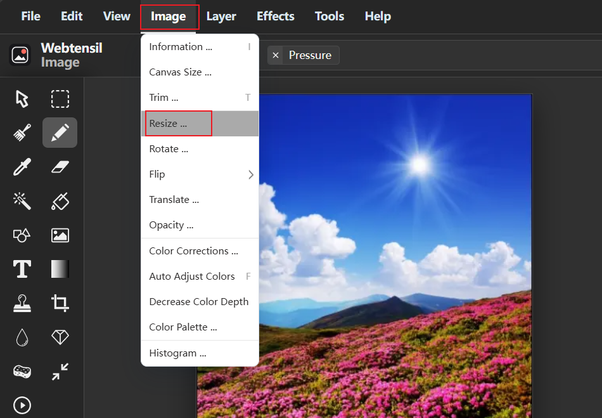
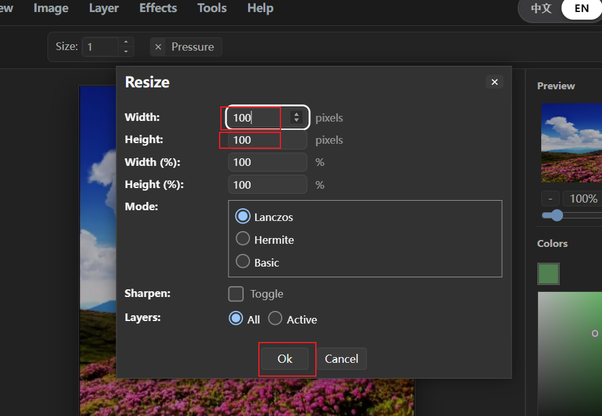
Step 2: Resize the image
Image > Resize
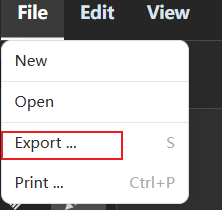
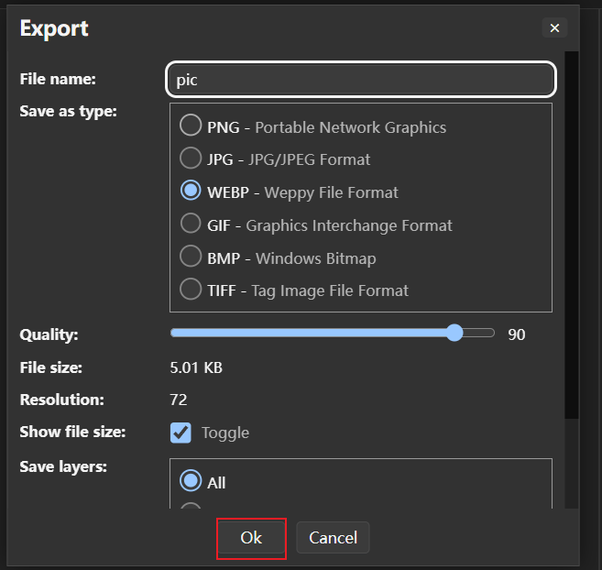
Step 3: Export the image
File > Export
Make Pic Size Reduce Part of Your Creative Workflow
Learning how to pic size reduce effectively can help freelance designers and content creators work faster and manage files more efficiently.
The best approach is not simply making every image as small as possible. Instead, resize images based on their purpose, compress carefully, and keep your original files for future use.
Tools like Webtensil Image make everyday editing easier by combining resizing, cropping, layers, text tools, and filters in one browser-based workspace. You can create professional visuals faster without installing complicated software.
A smarter image workflow means less time managing files and more time focusing on creating content.