Image Editing Guide
JPG Image Compressor: How to Reduce File Size Without Ruining Quality
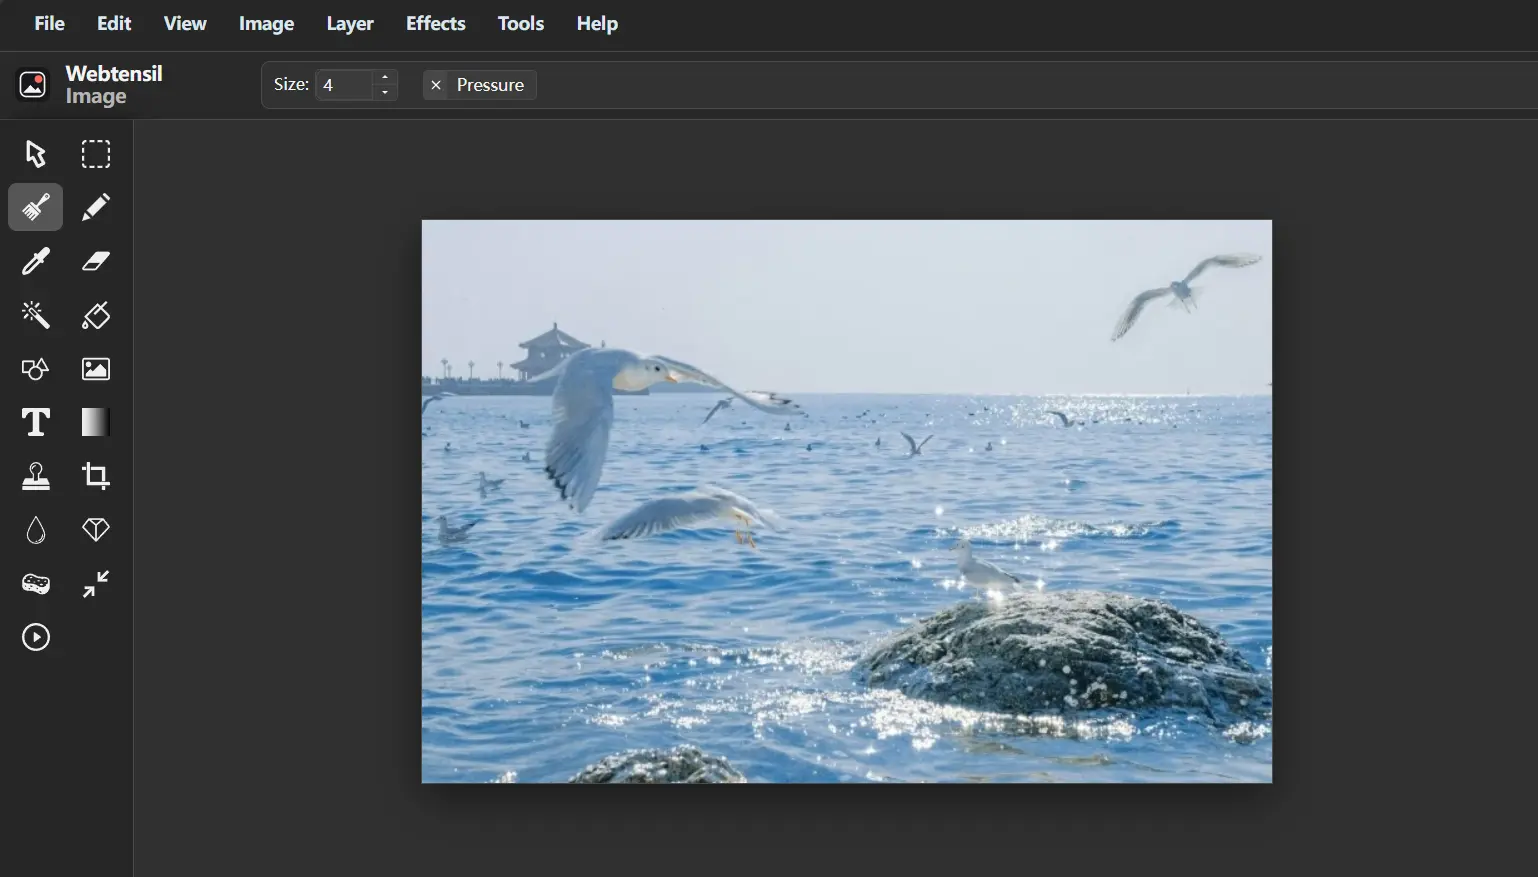
Large image files can quietly slow down your entire creative workflow. Maybe you are preparing images for a client website, uploading graphics to a blog, sending design previews, or creating content for social media. Everything looks fine until a JPG takes too long to upload, your website feels heavy, or an email attachment becomes too large.
That is where a jpg image compressor becomes useful. Instead of deleting details manually or rebuilding an image from scratch, compression can reduce file size while keeping the image visually acceptable.
For freelance designers and content creators, this matters more than it may seem. You often work with multiple images every day, and even small delays can add up quickly. At the same time, you do not want to sacrifice image quality just to save a few megabytes.
In this guide, we will look at how JPG compression works, when you should compress images, how to avoid common quality problems, and how browser-based editing tools can make the process easier without expensive software or complicated installation.
What Is a JPG Image Compressor?
A JPG image compressor is a tool that reduces the file size of a JPEG or JPG image.
The goal is simple: make the image smaller in terms of storage size while keeping it looking good enough for its intended use.
For example, you might have a JPG image that is 5 MB. After compression, it could become 1 MB or even smaller depending on the image and compression settings.
This can be useful for:
- Website images
- Blog posts
- Online portfolios
- Social media graphics
- Email attachments
- Client previews
- Online stores
- Presentation images
For freelancers, smaller files are also easier to organize, transfer, and send to clients.
Why JPG Files Can Become So Large
JPG is already a compressed image format, but files can still become surprisingly large.
This often happens when images come directly from cameras, smartphones, stock photo websites, or high-resolution design exports.
A photo may have dimensions of 5000 pixels or more even though you only need it to appear at around 1200 pixels on a website.
In that situation, you may be storing far more image data than you actually need.
Large JPG files can cause several problems:
- Slower website loading
- Longer upload times
- Larger storage requirements
- Slower client file transfers
- More difficult email sharing
- Poorer mobile browsing experience
Compressing images before publishing them can help reduce these issues.
How JPG Compression Actually Works
JPG uses what is called lossy compression.
That means some image information is removed to make the file smaller.
The important part is finding the right balance.
A small amount of compression may reduce file size significantly without creating obvious visual differences. Too much compression, however, can introduce problems such as:
- Blurry details
- Blocky areas
- Strange color transitions
- Visible artifacts around text
- Loss of fine textures
That is why the smallest possible file is not always the best result.
For most content creators, the goal should be to create the smallest file that still looks good at the size where people will actually see it.
When Should You Use a JPG Image Compressor?
You do not need to compress every image aggressively.
Compression is most useful when file size matters.
Before Uploading Images to a Website
Website performance is one of the most common reasons to compress JPG files.
If a blog post contains ten large images, each several megabytes in size, visitors may need to download a lot of unnecessary data before the page fully loads.
Smaller files can make the browsing experience smoother.
Before Sending Images to Clients
Freelance designers often send previews, drafts, and finished assets to clients.
Sending ten 8 MB images can be inconvenient, especially when email attachment limits are involved.
Compressed JPG copies can work well for previews while you keep the original full-quality files for final delivery.
Before Publishing Social Media Content
Social platforms usually process uploaded images anyway.
Uploading an extremely large file does not always give you a meaningful quality advantage.
Preparing an appropriately sized JPG before uploading can make your workflow faster and easier.
Before Adding Images to a Portfolio
A portfolio should showcase your work clearly, but it also needs to load quickly.
High-quality images are important, but unnecessarily huge files can make an otherwise attractive portfolio feel slow.
Resize Before You Compress
One of the easiest ways to reduce JPG file size is to resize the image before compressing it.
Imagine you have a 6000 × 4000 pixel photograph, but your website only displays it at 1200 pixels wide.
There is usually little reason to upload the full 6000-pixel version.
Instead, you could resize the image closer to the dimensions you actually need and then optimize the final JPG.
This approach often provides better results than applying extremely heavy compression to a huge image.
A practical workflow looks like this:
- Check where the image will be used.
- Decide the maximum dimensions you need.
- Resize the image.
- Review the visual quality.
- Export or compress the JPG.
- Compare the final file size with the original.
This gives you more control over both image quality and file size.
How to Use a JPG Image Compressor Without Losing Too Much Quality
Compression does not have to make your images look bad.
A few simple habits can help.
Keep Your Original File
Always keep an original version before compressing.
If you later need a larger image, a different crop, or higher quality, you will still have the source file available.
Avoid repeatedly compressing the same JPG because repeated saving can gradually reduce image quality.
Check the Image at Normal Viewing Size
Do not judge only by zooming in to 500%.
Most people will never see the image at that level.
Instead, look at the image at the approximate size where it will appear on your website or social platform.
If it still looks clean and sharp there, the compression level may be acceptable.
Pay Extra Attention to Text
JPG is usually better for photos than graphics containing lots of small text or sharp lines.
If your image contains text, zoom in briefly and check whether the letters have become fuzzy or surrounded by artifacts.
For certain graphics, another image format may be more appropriate.
Compress Based on Purpose
A client preview does not necessarily need the same file quality as a high-resolution final asset.
Likewise, a small blog thumbnail can usually be optimized more aggressively than a portfolio hero image.
Think about where the file will actually be used.
A Faster Workflow for Freelancers and Content Creators
When you are managing several client projects, you probably do not want a separate application for every small image task.
You may need to resize one image, crop another, add text to a third, and make color adjustments before exporting everything.
This is where a browser-based image editor can make your workflow more convenient.
Instead of opening a large desktop program just to make a small adjustment, you can handle common editing tasks directly in your browser.
A simple workflow might look like this:
- Open the image
- Resize it
- Crop unnecessary areas
- Adjust colors if needed
- Add text or graphic elements
- Check the final appearance
- Export the optimized version
Keeping these steps in one editing environment can save time.
Where Webtensil Image Fits Into the Workflow
Webtensil Image is a free browser-based image editor designed for common editing tasks.
It is not only useful when preparing images for compression. You can also use it to resize, crop, adjust, and edit an image before creating your final JPG.
The editor includes tools such as:
- Layer-based editing
- Image resizing
- Cropping
- Selection tools
- Text tools
- Brush tools
- Color adjustments
- Blur effects
- Sharpening
- Desaturation
- Filters
Layers can be particularly useful for freelance designers.
For example, if you are preparing a promotional graphic, you can keep the photo, headline, and other elements separate. This makes it easier to resize or rearrange the design before exporting the final image.
Webtensil Image works directly in the browser, so there is no software to install and no account is required.
Why Browser-Based Editing Can Save Time
A common problem with professional design software is that the tool can be much larger than the task.
You might only need to resize a JPG and adjust the brightness, but first you have to open a large application, wait for it to load, and navigate through a complicated interface.
For advanced design work, that software may be completely justified.
For simple daily editing tasks, however, a lightweight browser tool can be more practical.
This is especially useful when:
- You are using a temporary computer
- You do not have permission to install software
- You need to make a quick client revision
- You only need basic editing features
- You want to avoid paid subscriptions for small tasks
Webtensil Image supports Chrome, Edge, Firefox, and Safari, making it accessible across most modern desktop browsers.
Privacy Matters When Editing Client Images
Online image tools are convenient, but freelancers should also think about privacy.
You may occasionally edit unpublished campaign graphics, screenshots, internal documents, client photos, or other material that you would rather not upload unnecessarily.
Webtensil Image performs its core editing locally in your browser rather than requiring the image to be uploaded to the application's server for processing.
This can be helpful when you want a simple online editing experience while keeping image processing on your own device.
You should still follow your client's own privacy, confidentiality, and data-handling requirements.
JPG Compression vs Image Resizing
Compression and resizing are related, but they are not the same thing.
Resizing changes the width and height of an image.
Compression reduces the amount of data used to store the image.
For best results, you often want to use both.
For example:
Original image:
- 5000 × 3000 pixels
- 6 MB
You might first resize it to:
- 1600 × 960 pixels
Then optimize or compress the JPG.
The result could be dramatically smaller while still looking perfectly suitable for a website or blog.
This is usually a better strategy than keeping the image at 5000 pixels wide and applying extreme compression.
Common JPG Compression Mistakes to Avoid
A good image workflow is often about avoiding unnecessary mistakes.
One common mistake is choosing the highest possible quality setting every time. Maximum quality can create unnecessarily large files without providing a visible improvement for normal web use.
Another mistake is compressing the same JPG again and again.
It is better to return to your original file and create a new optimized version whenever possible.
You should also avoid enlarging a small compressed JPG after the fact. Once detail has been removed, simply making the image larger will not restore it.
Finally, do not optimize based only on file size.
A 50 KB image is not a good result if it looks terrible. Balance matters.
A Simple Image Optimization Checklist
Before publishing an image, ask yourself:
- Is the image larger than it needs to be?
- Have I resized it for its actual use?
- Does the JPG still look clear?
- Is text readable?
- Are there visible compression artifacts?
- Do I still have the original file?
- Is the final file size reasonable?
- Am I using the right format for this type of image?
You do not need a complicated optimization process.
A few checks can make a noticeable difference when repeated across dozens or hundreds of images.
How do I compress KB size of a photo?
I use this free online tool to resize images.
How to do it in 30 seconds:
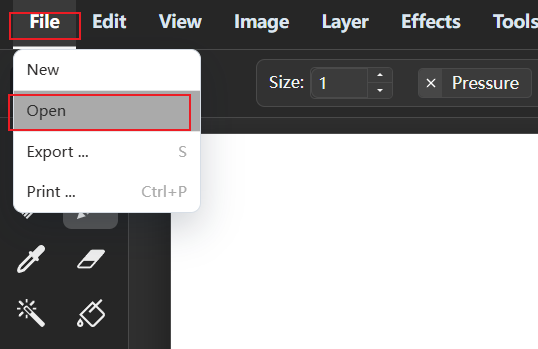
Step 1. Open a file
File > Open
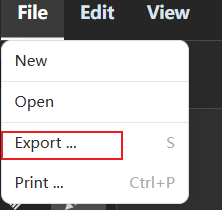
Step 2: Export the image
File > Export
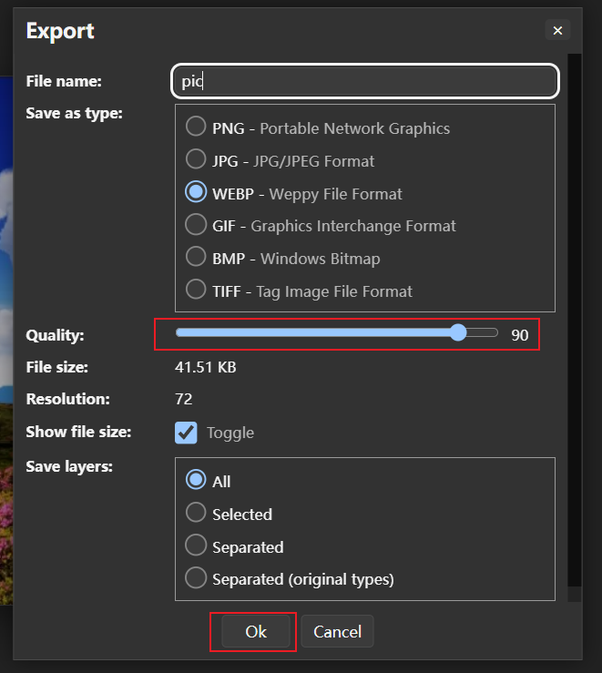
Drag the Quality slider to adjust the size to 1MB, and press Ok
Make JPG Compression Part of Your Everyday Workflow
Using a jpg image compressor is not just about creating smaller files. It is about making your overall creative workflow faster and more practical.
For freelancers and content creators, a good process is to keep the original image, resize it based on where it will be used, compress it carefully, and check the result at normal viewing size. This helps you avoid both oversized files and unnecessary quality loss.
You also do not need expensive software for every image-related task. A browser-based editor such as Webtensil Image can help you handle resizing, cropping, layers, text, filters, and basic image adjustments before preparing your final JPG.
The best image workflow is usually the one that stays simple: use the right dimensions, keep the quality you actually need, and avoid carrying extra file size that nobody will notice.