Image Editing Guide
Compress PNG: How to Reduce PNG File Size Without Losing Quality
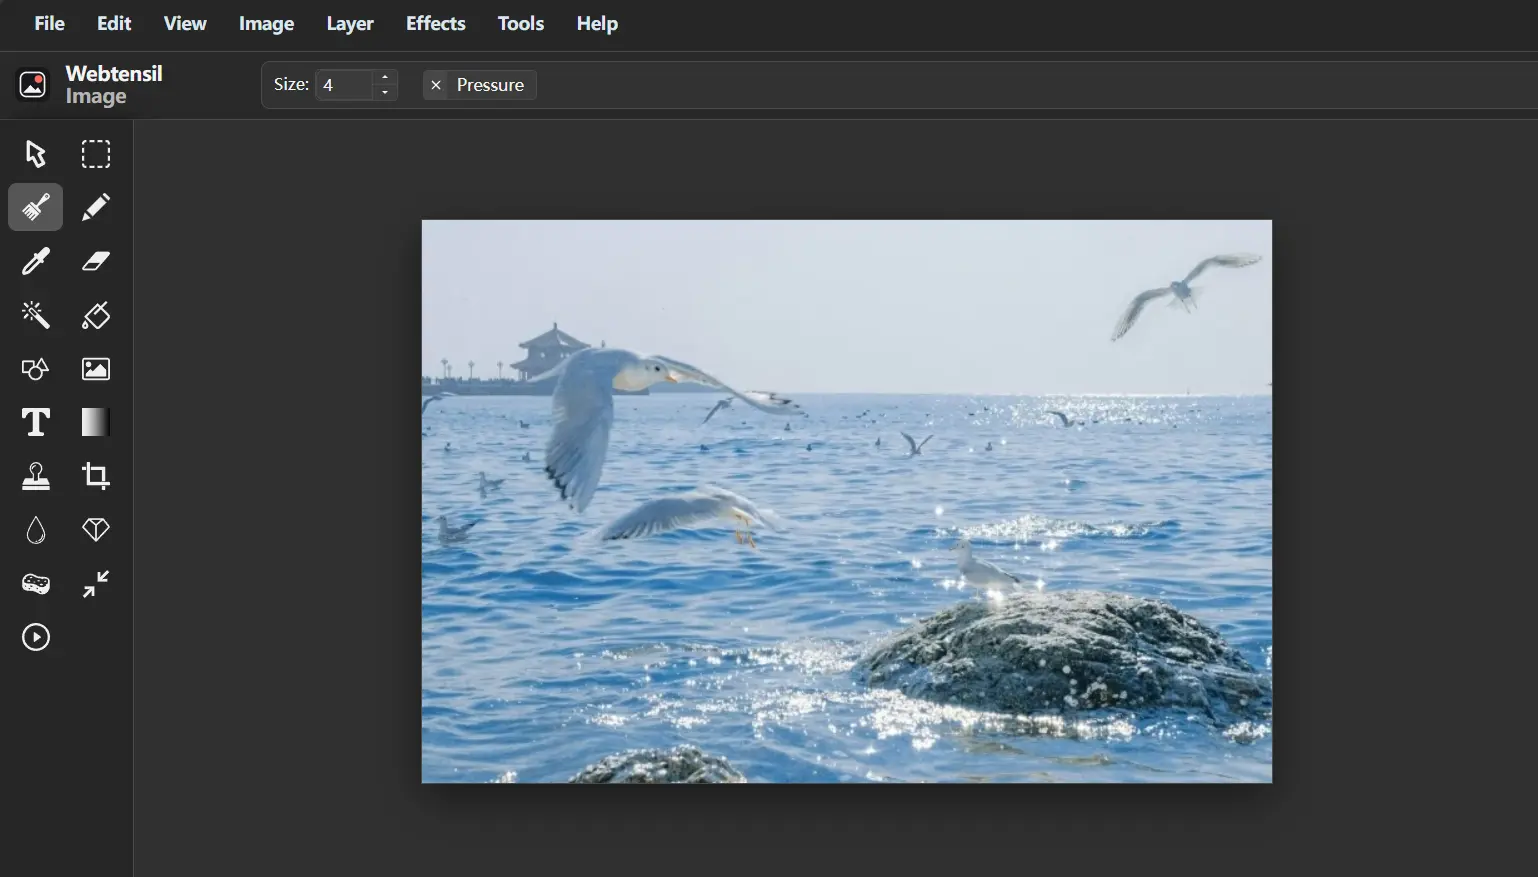
PNG images are widely used for websites, designs, screenshots, logos, and digital content because they provide excellent image quality and support transparent backgrounds. However, PNG files can sometimes become much larger than expected, especially when they contain detailed graphics, high-resolution images, or multiple design elements.
For freelance designers and content creators, large PNG files can slow down uploads, make websites heavier, and create unnecessary storage problems. That is why many people look for ways to compress PNG files while keeping the original quality as much as possible.
The challenge is finding the right balance. Reducing file size too aggressively may affect image clarity, while keeping oversized files can make your workflow slower.
In this guide, we will explain why PNG files become large, how PNG compression works, practical ways to reduce image size, and how browser-based editing tools like Webtensil Image can help creators manage images faster without complicated software.
Why Compress PNG Files?
PNG is known for maintaining high image quality, especially for graphics that contain text, icons, logos, and transparent backgrounds. Unlike JPG, PNG uses lossless compression, meaning it preserves image details during saving.
However, quality comes with a cost: larger file sizes.
Large PNG files can create several problems:
- Slower website loading speeds
- Longer upload times
- More storage usage
- Difficult file sharing
- Slower design workflows
For example, a simple website graphic may not need to be several megabytes. Optimizing the file can make it faster to use while keeping the visual quality people expect.
How PNG Compression Works
PNG compression works differently from JPG compression.
Instead of removing image details, PNG compression reduces unnecessary data inside the file.
This makes PNG ideal for:
- Logos
- Illustrations
- Screenshots
- Interface designs
- Images with transparent backgrounds
However, some PNG files are still large because of:
- High image resolution
- Too many colors
- Unnecessary metadata
- Large transparent areas
- Complex visual details
Reducing these elements can help lower file size.
Compress PNG Without Losing Image Quality
Many creators worry that compressing PNG images will make them blurry.
The good news is that PNG files can often be optimized without noticeable quality changes.
Here are some practical methods.
Resize Large PNG Images
One of the easiest ways to reduce PNG file size is resizing.
A PNG image that is much larger than its display size contains unnecessary pixels.
For example:
- Original image: 4000 × 4000 pixels
- Website display size: 800 × 800 pixels
Reducing the dimensions can significantly decrease the file size.
Before compressing, always consider where the image will be used.
A website thumbnail, social media graphic, and design presentation may require completely different dimensions.
Remove Unnecessary Elements
Sometimes PNG files become large because they contain extra elements that are not needed.
Before exporting, check:
- Hidden design layers
- Unused objects
- Extra backgrounds
- Duplicate elements
Cleaning up the file before saving can make the final image smaller.
Choose the Right Image Format
PNG is not always the best choice for every image.
PNG works well for:
- Graphics
- Text-based images
- Transparent designs
- Simple illustrations
For photographs with many colors, JPG may create a much smaller file.
Choosing the right format can improve both performance and workflow.
A Faster Workflow for Freelance Designers and Content Creators
Freelancers often work on many different visual projects.
One day you may need to optimize a website image. The next day you may create social media graphics, edit client designs, or prepare marketing materials.
Using separate tools for every small task can slow you down.
A better workflow is to use one editing environment where you can:
- Open your image.
- Resize the canvas or image.
- Edit design elements.
- Adjust colors and effects.
- Export the final file.
This reduces unnecessary switching between different applications.
Using Webtensil Image for PNG Editing
Webtensil Image is a free browser-based image editor designed for everyday creative work.
Before exporting or optimizing PNG files, creators often need to make additional edits. Webtensil Image provides useful tools for preparing images efficiently.
Features include:
- Layer-based editing
- Image resizing
- Cropping tools
- Selection tools
- Text editing
- Brush tools
- Color adjustments
- Blur effects
- Sharpening
- Filters
- Desaturation effects
The layer system is especially helpful for designers.
For example, when creating a PNG graphic with text, illustrations, and multiple visual elements, each part can be edited separately. You can move, adjust, and refine individual elements before creating the final image.
Why Browser-Based Image Editing Is Useful
Professional design software offers advanced features, but many everyday tasks do not require complicated tools.
Sometimes you only need to:
- Resize a PNG
- Edit a graphic
- Add text
- Adjust colors
- Prepare an image for publishing
A browser-based editor can make these tasks faster because:
- No installation is required
- You can work from different devices
- Editing starts immediately
- Common tools are available in one place
Webtensil Image works with popular browsers including Chrome, Edge, Firefox, and Safari.
It is also free to use without creating an account or downloading software.
Privacy Matters When Editing PNG Images
Designers often work with files that should remain private.
Examples include:
- Client graphics
- Business materials
- Unreleased designs
- Marketing images
- Website assets
Webtensil Image performs core editing operations locally in the browser instead of requiring images to be uploaded to an application server.
This gives creators more control over their files during normal editing tasks.
Of course, professional projects should always follow client privacy agreements and data-handling requirements.
Common PNG Compression Mistakes
When reducing PNG file size, avoid these mistakes:
Compressing Without Checking the Purpose
A website icon and a high-quality presentation graphic need different settings.
Always optimize based on where the image will be used.
Reducing Dimensions Too Much
Making an image extremely small may remove important details.
Choose a size that matches the actual requirement.
Editing Only the Final Compressed File
Always keep the original version.
Creating new versions from the original helps maintain flexibility for future projects.
Ignoring Mobile Users
Many people access websites through mobile devices.
Optimized images help create faster and smoother experiences.
Simple PNG Optimization Checklist
Before publishing a PNG image, check:
- Is the image larger than necessary?
- Are the dimensions suitable?
- Are unused elements removed?
- Does the image still look clear?
- Is the file size reasonable?
- Do you have the original file saved?
These simple steps can make image management much easier.
How do I compress KB size of a photo?
I use this free online tool to resize images.
How to do it in 30 seconds:
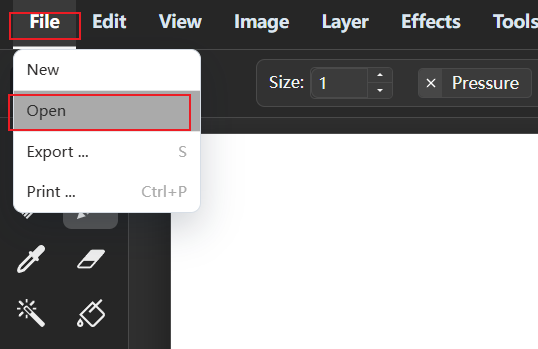
Step 1. Open a file
File > Open
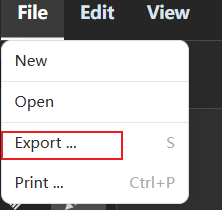
Step 2: Export the image
File > Export
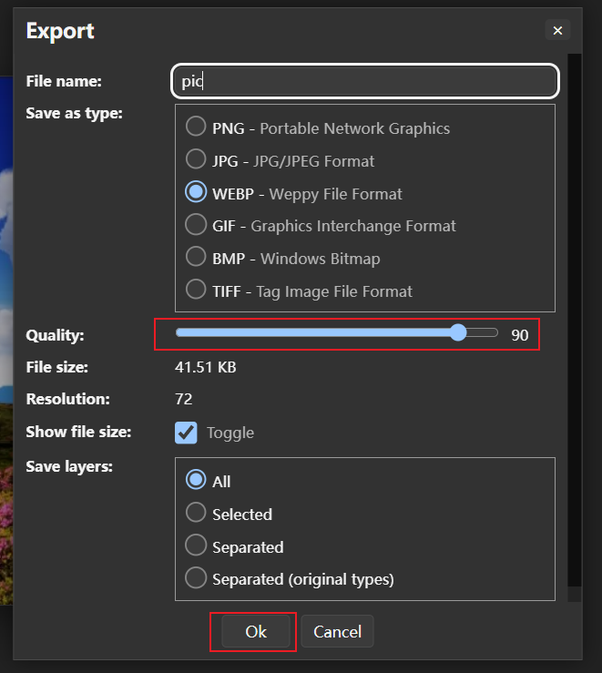
Drag the Quality slider to adjust the size to 1MB, and press Ok
Make Compress PNG Part of Your Creative Workflow
Learning how to compress PNG files effectively can help freelance designers and content creators build a faster and more efficient workflow.
The goal is not simply to make files smaller. The goal is to create images that maintain quality while being easier to upload, share, and use online.
With tools like Webtensil Image, creators can combine resizing, cropping, layers, text editing, and visual adjustments in one browser-based workspace.
By choosing the right dimensions, cleaning up unnecessary elements, and optimizing files carefully, you can spend less time managing images and more time creating professional visual content.