Image Editing Guide
Compress JPEG Format How to Reduce Image Size Without Losing Quality
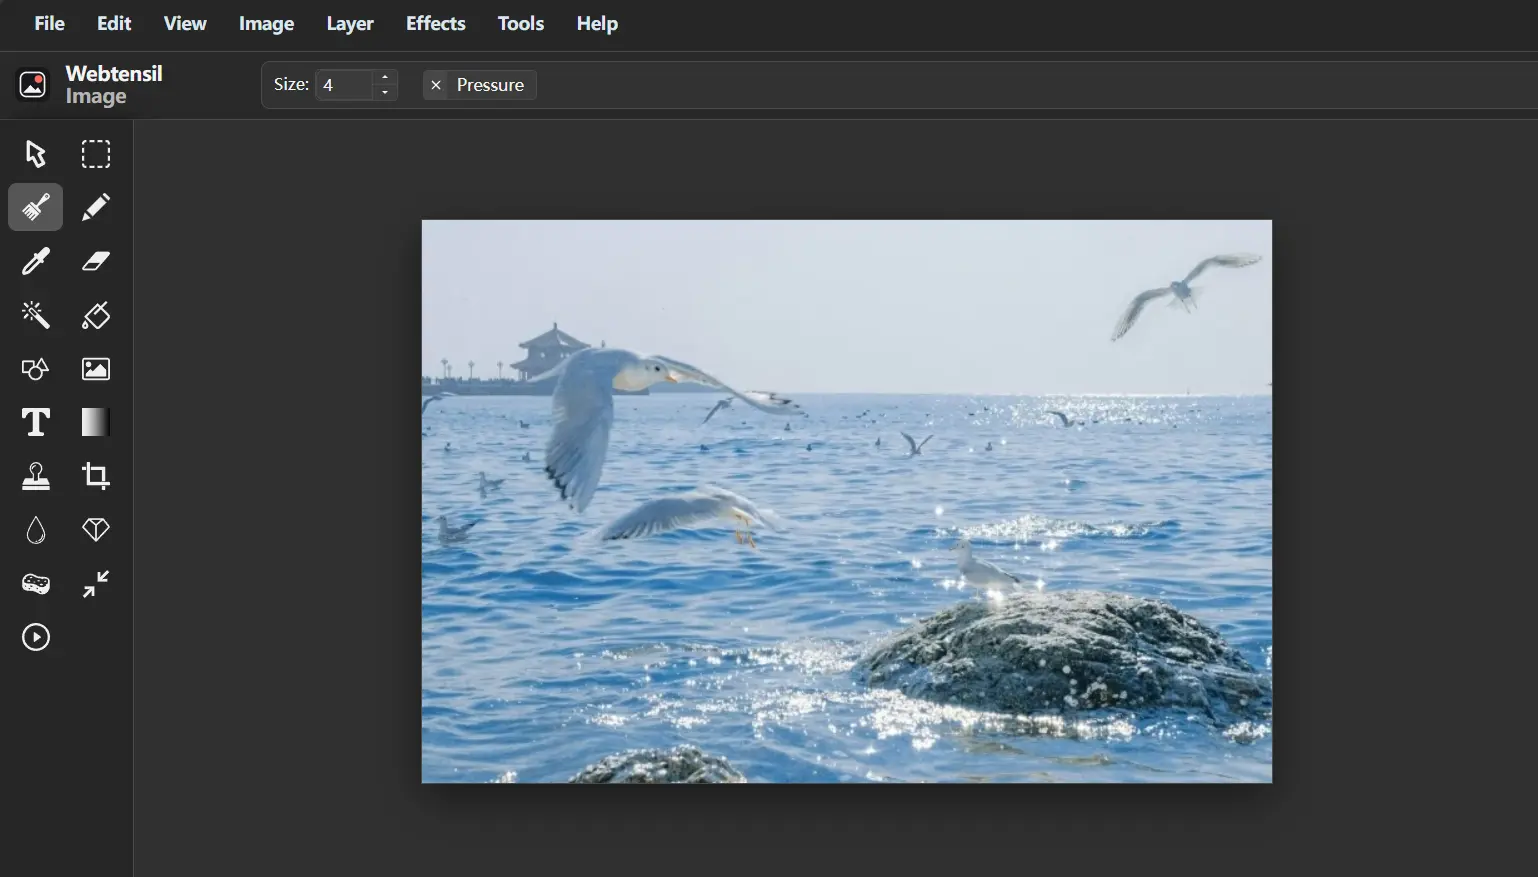
High-quality images are essential for websites, social media, blogs, and digital projects. However, large JPEG files can quickly become a problem. They take longer to upload, slow down websites, use more storage space, and make sharing files with clients more difficult.
Many freelancers and content creators need a simple way to compress JPEG format files while keeping their images looking professional. The challenge is finding the right balance between smaller file sizes and good visual quality.
You do not always need expensive design software to optimize your images. With the right tools and workflow, you can reduce JPEG file sizes, resize pictures, and make basic edits quickly from your browser.
In this guide, we will explain what JPEG compression does, why reducing image size matters, how to maintain image quality, and how browser-based editing tools like Webtensil Image can help creators work faster without complicated software.
Why Compress JPEG Format Files
JPEG is one of the most common image formats because it provides good image quality while keeping file sizes relatively small. However, JPEG files can still become very large, especially when they come from modern cameras or smartphones.
A high-resolution photo may contain much more detail than you need for online use.
For example
- A camera photo may be 8 MB
- A website image may only need to be 500 KB
- A social media post may require an even smaller file
Reducing unnecessary image data can improve your workflow and make digital content easier to manage.
Common reasons to compress JPEG files include
- Faster website loading
- Quicker uploads
- Easier client sharing
- Lower storage usage
- Better mobile performance
- More efficient content creation
How JPEG Compression Works
When you compress a JPEG image, the file size is reduced by removing some image information.
JPEG uses a method called lossy compression. This means some details that are less noticeable to the human eye can be removed to create a smaller file.
A good compression process keeps the image visually similar while reducing unnecessary data.
However, excessive compression can cause problems such as
- Blurry details
- Pixelated areas
- Color changes
- Visible compression artifacts
The goal is not to create the smallest possible file. The goal is to create a file that is small enough while still looking professional.
Compress JPEG Format Without Losing Quality
Many people worry that compressing images will make them look worse.
In reality, careful optimization can significantly reduce file size without noticeable quality loss.
Here are some practical tips.
Resize Before Compression
One of the most effective ways to reduce JPEG size is resizing the image first.
For example, a 5000 × 4000 pixel image may be much larger than needed for a blog post.
If the final display size is only 1200 pixels wide, resizing the image before compression removes unnecessary data.
A better workflow is
- Check where the image will be used.
- Choose the correct dimensions.
- Resize the image.
- Apply compression.
- Review the final quality.
This usually creates better results than applying heavy compression to an oversized image.
Keep the Original Image
Always save the original high-quality version.
You may need it later for
- Different website layouts
- New marketing campaigns
- Client revisions
- Larger designs
Instead of repeatedly compressing the same file, create new versions from the original.
Check Images at Normal Viewing Size
Do not judge image quality only by zooming in extremely close.
Most visitors will see your image at its normal display size.
A compressed image that looks slightly different at 400% zoom may still look perfect on a website or social media post.
A Better Workflow for Freelance Designers
Freelance designers and content creators often handle many image tasks every day.
You may need to
- Reduce JPEG file size
- Resize photos
- Add text
- Adjust colors
- Apply filters
- Create different versions for platforms
Switching between multiple programs can slow down your workflow.
A browser-based image editor allows you to complete several tasks in one place.
A practical workflow could be
- Open the original image.
- Crop unnecessary areas.
- Resize the image.
- Adjust colors or brightness.
- Add text or graphic elements.
- Export the optimized JPEG.
This reduces unnecessary steps and saves time.
Using Webtensil Image to Prepare JPEG Files
Webtensil Image is a free browser-based image editor designed for everyday creative tasks.
Before compressing or exporting an image, creators often need to make adjustments first. Webtensil Image provides tools that help prepare images for different uses.
Features include
- Layer-based editing
- Image resizing
- Cropping
- Selection tools
- Text editing
- Brush tools
- Color adjustments
- Blur effects
- Sharpening
- Filters
- Desaturation tools
The layer system is especially useful for designers.
For example, when creating a social media graphic, you can keep the background image, text, and design elements separate. This makes it easier to edit and resize your design before creating the final JPEG file.
Why Use a Browser-Based Image Editor
Professional desktop software can be powerful, but it may be unnecessary for simple editing tasks.
Sometimes you only need to
- Compress a JPEG
- Resize an image
- Add simple text
- Make color adjustments
A browser-based editor can make these tasks faster because
- No installation is required
- You can access it from different devices
- Editing starts immediately
- Common tools are available together
Webtensil Image works directly in modern browsers including Chrome, Edge, Firefox, and Safari.
It is also free to use without creating an account or downloading additional applications.
Privacy Considerations When Editing Images
Image privacy matters, especially for freelancers working with clients.
You may edit
- Private photos
- Client designs
- Unreleased products
- Marketing graphics
- Business materials
Webtensil Image processes core editing tasks locally in the browser instead of requiring images to be uploaded to an application server.
This can help creators maintain better control over their files during everyday editing.
However, always follow your own client agreements and privacy requirements when handling professional materials.
Common JPEG Compression Mistakes
Avoid these common mistakes when optimizing JPEG images.
Compressing Too Much
The smallest file is not always the best file.
If the image becomes blurry or loses important details, reduce the compression level.
Ignoring Image Dimensions
A large image with unnecessary pixels will still create a larger file.
Resize images based on their actual purpose.
Editing a Compressed Copy
Always keep your original file.
Creating new versions from the original helps maintain better quality.
Forgetting Mobile Users
Many people view websites on mobile devices.
Optimized images help create a smoother experience for visitors using slower connections.
Simple JPEG Optimization Checklist
Before publishing a JPEG image, check
- Is the image larger than necessary
- Have I resized it correctly
- Is the quality still clear
- Are text and details readable
- Is the file size reasonable
- Do I still have the original version
These simple steps can improve your image workflow significantly.
How do I compress KB size of a photo?
I use this free online tool to resize images.
How to do it in 30 seconds:
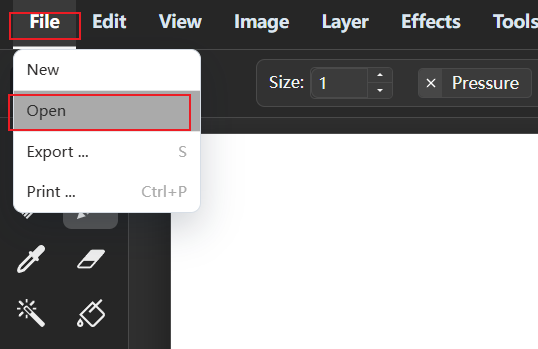
Step 1. Open a file
File > Open
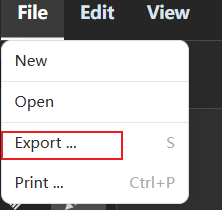
Step 2: Export the image
File > Export
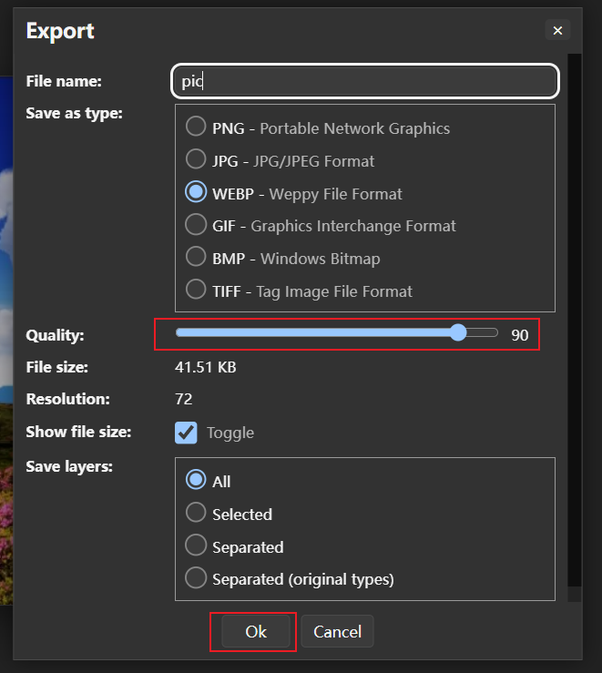
Drag the Quality slider to adjust the size to 1MB, and press Ok
Make Compress JPEG Format Part of Your Creative Workflow
Learning how to compress JPEG format files effectively can help freelance designers and content creators save time and create faster workflows.
The best approach is not simply making images as small as possible. Instead, resize images according to their purpose, compress carefully, and keep original files for future needs.
Tools like Webtensil Image make everyday editing easier by combining resizing, cropping, layers, text tools, and filters in one browser-based workspace.
By using the right tools and a simple optimization process, you can create professional visuals faster while keeping your workflow efficient and organized.