Image Editing Guide
Compress Foto JPG Online: How to Reduce Image Size Without Losing Quality
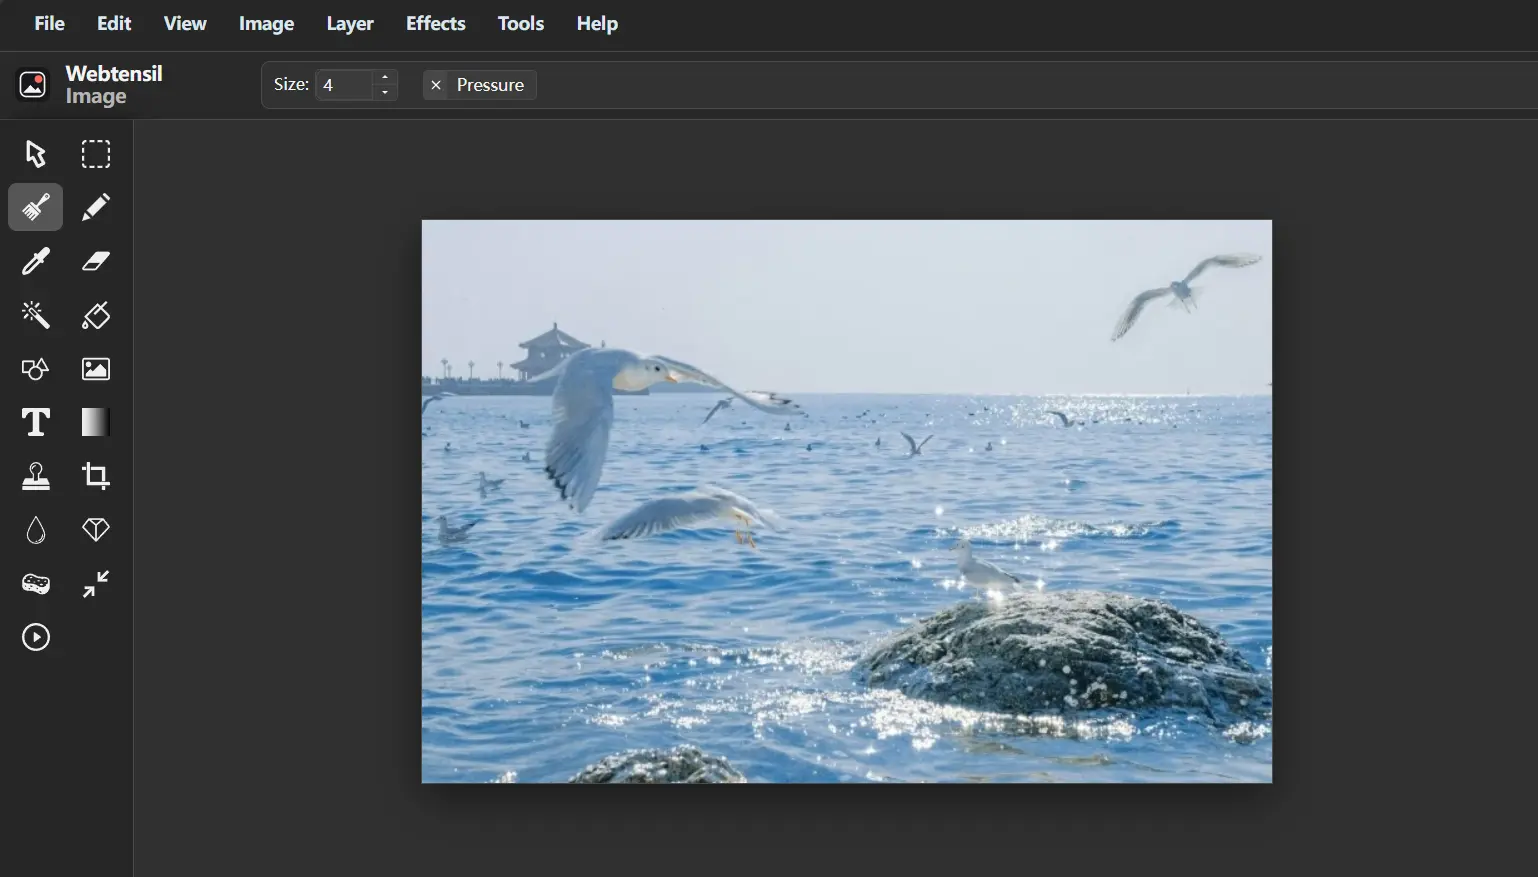
If you create content for websites, social media, blogs, or clients, you probably work with JPG images almost every day. The problem usually starts when those images are much larger than they need to be. A single high-resolution photo can take up several megabytes, making websites slower, uploads longer, and client deliveries more difficult.
That is why many people search for ways to compress foto jpg files quickly without making their images look blurry or pixelated. You do not necessarily need expensive design software or a complicated desktop program to do it.
For freelance designers and content creators, the best workflow is often surprisingly simple: resize the image to the dimensions you actually need, optimize the JPG, and check the final quality before publishing.
In this guide, we will explain how JPG compression works, why image size matters, how to avoid common compression mistakes, and how browser-based tools such as Webtensil Image can help you prepare your images without installing additional software.
What Does Compress Foto JPG Mean?
When people search for compress foto jpg, they are usually looking for a way to make a JPG or JPEG photo smaller in file size.
For example, you might have a photo that is:
- 5 MB in size
- 4000 × 3000 pixels
- Too large for a website or email
After resizing and compression, the same image might become only a fraction of its original file size while still looking good on a screen.
This is particularly useful for:
- Blog images
- Website photos
- Social media graphics
- Portfolio images
- Email attachments
- Client previews
- Online store product photos
- Digital marketing content
The important thing is not simply to create the smallest possible file. The goal is to reduce file size while keeping enough image quality for the way the photo will actually be used.
Why Should You Compress JPG Images?
Modern smartphones and cameras produce very large photos.
That is useful when you want to print an image or edit it in detail, but it can be unnecessary when the final image will only appear on a website.
Imagine uploading a 6000-pixel-wide photo to a blog where it is displayed at only 1200 pixels.
Visitors still have to download a much larger file than they really need.
For content creators, this can create several problems.
Faster Website Loading
Large images can add significant weight to a web page.
If an article contains several high-resolution photos, loading the page may take noticeably longer, especially for visitors using mobile connections.
Reducing unnecessary image data can help create a smoother browsing experience.
Faster Uploads
If you regularly upload images to WordPress, social media platforms, or client websites, large JPG files take longer to transfer.
Smaller files make repetitive publishing tasks faster.
Easier File Sharing
Freelancers often need to send drafts and previews to clients.
Sending several large photos through email or messaging tools can quickly become inconvenient.
Compressed versions are often perfectly suitable for reviews and previews.
Less Storage Space
If you manage hundreds or thousands of images, file size adds up.
Optimized JPG files can reduce the amount of storage required for your website, cloud storage, and project folders.
How JPG Compression Works
JPG is already a compressed image format.
It uses something called lossy compression, which means some image information can be removed to make the file smaller.
The more aggressively you compress an image, the smaller the file becomes.
However, too much compression may create visible problems such as:
- Blurry details
- Blocky areas
- Color banding
- Rough edges
- Compression artifacts
- Poor-looking text
This is why JPG compression is always a balance between file size and visual quality.
For many web images, you can reduce the file size considerably before the difference becomes obvious at normal viewing size.
Resize Your Image Before Compressing It
One of the easiest ways to reduce a JPG file is to resize the image first.
Consider this example.
Your original photograph is:
5000 × 3500 pixels
But your blog only displays images at:
1200 pixels wide
Instead of applying very heavy compression to the 5000-pixel image, resize it closer to the dimensions you actually need.
Then optimize the JPG.
A simple workflow is:
- Open the original image.
- Check where the image will be published.
- Resize it to appropriate dimensions.
- Make any necessary edits.
- Export the JPG.
- Check both quality and file size.
This usually gives you better results than trying to solve everything with compression alone.
How to Compress Foto JPG Without Ruining Image Quality
Reducing file size is useful, but not if the final image looks terrible.
Here are a few simple ways to maintain better quality.
Keep the Original Image
Never rely only on your compressed copy.
Keep the full-quality original somewhere safe so you can return to it if you later need a larger version.
A simple project structure could look like this:
- Originals
- Edited
- Web
- Social Media
- Client Delivery
This becomes especially useful when a client asks for a different size several weeks later.
Avoid Compressing the Same File Repeatedly
Repeatedly opening and saving the same JPG can gradually reduce its quality.
Instead, return to the original image whenever you need a new version.
Think of the original as your master copy.
Check the Image at Normal Size
When evaluating compression, do not only inspect the image at extreme zoom levels.
Ask yourself how people will actually see it.
If the image is going to appear at 800 pixels wide in a blog post, check how it looks at approximately that size.
Tiny imperfections that appear at 400% zoom may never be noticeable to a normal visitor.
Pay Attention to Text and Sharp Edges
JPG usually works especially well for photographs.
However, compression artifacts can become more noticeable around:
- Small text
- Logos
- Icons
- Sharp lines
- Interface screenshots
If your design contains these elements, inspect them carefully before publishing.
A Practical Workflow for Freelance Designers
Freelance designers rarely have just one image task.
You may need to resize a client's photo, crop another image, add a headline to a graphic, adjust colors, and prepare several versions for different platforms.
Opening several different applications for these small tasks can slow your workflow down.
A more practical process might look like this:
- Open the image in a browser-based editor.
- Crop unnecessary areas.
- Resize the image.
- Adjust brightness, color, or sharpness.
- Add text or other visual elements.
- Review the final design.
- Export the finished image.
The important idea is to handle as many related editing tasks as possible in one place.
Using Webtensil Image Before JPG Compression
Webtensil Image is a free browser-based image editor that can be useful when preparing JPG files for online use.
For example, before compressing an image, you may want to resize it, crop it, change its colors, or add text.
Webtensil Image includes tools for:
- Image resizing
- Cropping
- Selection
- Text editing
- Brush drawing
- Color adjustments
- Blur
- Sharpening
- Desaturation
- Filters
- Layer-based editing
Layers are especially useful when your JPG is part of a larger design.
Imagine creating a promotional graphic containing a photograph, headline, and several visual elements. With layers, you can manage those elements separately instead of combining everything immediately.
You can resize or reposition individual elements before exporting the final image.
Why Browser-Based Editing Can Be Useful
Professional desktop software is powerful, but you do not always need that level of complexity.
Sometimes you simply want to resize a photo before uploading it.
Installing a large application just for a small editing task can feel unnecessary.
A browser-based editor is useful when:
- You want to make a quick edit
- You do not want to install software
- You are using another computer
- You need to resize a JPG
- You need to crop an image
- You want to add simple text
- You need basic color adjustments
Webtensil Image does not require an account, download, or installation.
It works with modern browsers including Chrome, Edge, Firefox, and Safari.
For freelancers who frequently switch between different creative tasks, removing those extra setup steps can make everyday editing more convenient.
Think About Privacy When Using Online Image Tools
There is another factor worth considering when choosing an online image editor: where your images are processed.
Freelancers may work with:
- Client photographs
- Unpublished marketing materials
- Website screenshots
- Product images
- Internal graphics
- Draft campaign assets
Not every file needs to be uploaded to a remote application server.
Webtensil Image performs its core editing locally in your browser. This means the main image-processing workflow can happen on your device rather than requiring the image to be uploaded to the application's server.
This can be useful for people who prefer to avoid unnecessary uploads during routine editing.
Of course, you should always follow any privacy or confidentiality requirements agreed upon with your clients.
JPG Compression vs Resizing: What's the Difference?
It is easy to confuse resizing and compression.
They are related, but they are not the same.
Image resizing changes the pixel dimensions.
For example:
4000 × 3000 → 1200 × 900
Image compression reduces the amount of data needed to store the image.
In many cases, you should do both.
For example, a 6 MB photograph might be much larger than necessary because it has huge dimensions.
Resizing it first can dramatically reduce the amount of image data.
Compression can then reduce the file size further.
Using these two methods together is often more effective than aggressively compressing the original high-resolution image.
Common JPG Compression Mistakes
There are a few mistakes worth avoiding.
Trying to Get the Smallest File Possible
A smaller file is not automatically better.
If aggressive compression makes the image blurry, you have gone too far.
Aim for a reasonable file size rather than the absolute minimum.
Uploading Huge Images and Relying on the Website
Some websites automatically resize uploaded images.
However, it is still a good habit to prepare appropriately sized files before uploading them.
This gives you more control over image quality and your media library.
Deleting the Original File
You may think you will never need the original again.
Then a client asks for a larger banner.
Keep the original.
Storage is usually easier to manage than rebuilding lost image quality.
Enlarging a Small Compressed Image
If an image has already been made very small and heavily compressed, enlarging it later will not restore the missing detail.
Always create new versions from the largest good-quality source available.
A Quick JPG Optimization Checklist
Before publishing your image, check the following:
- Is the image larger than it needs to be?
- Have you resized it for its intended use?
- Does the image still look sharp?
- Is text easy to read?
- Are there obvious compression artifacts?
- Is the file size reasonable?
- Have you kept the original image?
- Are you using the right image format?
This process only takes a short time once it becomes part of your regular workflow.
How do I compress KB size of a photo?
I use this free online tool to resize images.
How to do it in 30 seconds:
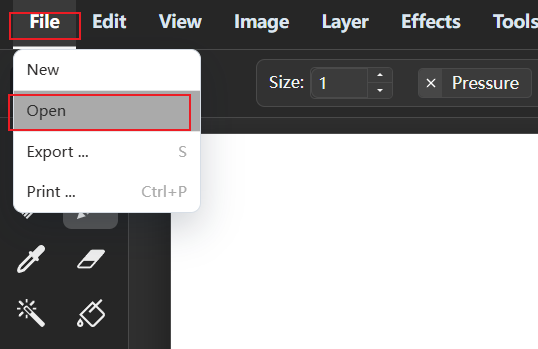
Step 1. Open a file
File > Open
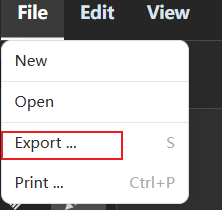
Step 2: Export the image
File > Export
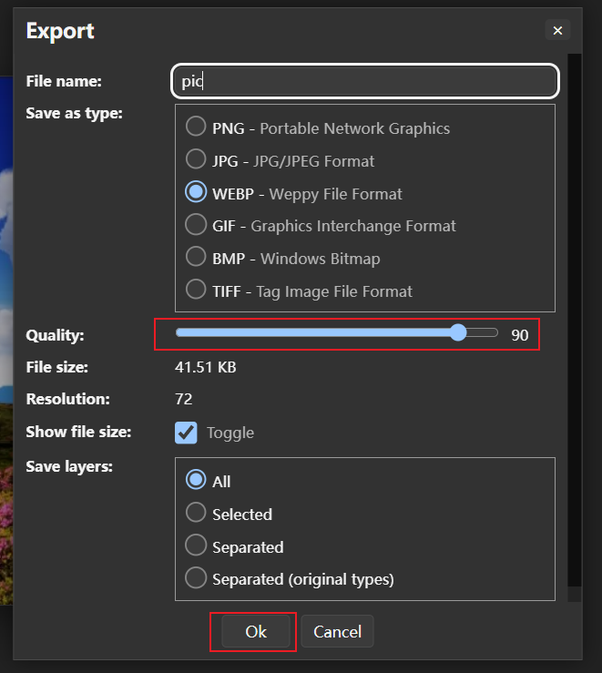
Drag the Quality slider to adjust the size to 1MB, and press Ok
Compress Foto JPG Files as Part of a Smarter Creative Workflow
If you regularly need to compress foto jpg files, the goal should not simply be to make every image as small as possible. A better approach is to resize images for their actual purpose, preserve your original files, avoid repeated compression, and check quality before publishing.
For freelance designers and content creators, combining resizing, cropping, adjustments, and other edits in one workflow can also save time. Browser-based editors such as Webtensil Image can help with common tasks including layers, text, filters, cropping, and resizing without requiring software installation or account registration.
A good JPG workflow does not need to be complicated. Start with a quality original, prepare the right dimensions, optimize only as much as necessary, and make sure the final image still looks good to the people who will actually see it.